Workbook and Worksheet Object
Explore the basics of the Workbook and Worksheet objects in Excel VBA.
Object Hierarchy
In Excel VBA, an object can contain another object, which itself can contain another, forming a nested, hierarchical structure of objects and their relationships. In other words, Excel VBA programming requires understanding and using an object hierarchy. This could seem a little difficult, but we will make it easier to understand.
The mother of all objects is Excel itself. We call it the Application object. The application object contains other objects. For example, the Workbook object (Excel file). This refers to any workbook you have created in the past. The Workbook object contains multiple objects, like Worksheet objects, which store data and provide structure. The Worksheet object contains other objects, including the Range object, used to represent cell areas.
The “Create a Macro” chapter explains executing code by clicking a command button in Excel. We used the following code line:
Range("A1").Value = "Hello"But what we really meant was:
Application.Workbooks("create-a-macro").Worksheets(1).Range("A1").Value = "Hello"Note: the objects are connected with a dot. Thankfully, we do not need to add a line of code in this manner. The reason is that we added our command button to the create-a-macro.xlsm file, specifically on the first worksheet. Keep in mind that if you want to change something on multiple worksheets, the Worksheet object is required.
Collections
All workbooks that are open at the moment are part of the Workbooks collection. The Worksheets collection includes all individual worksheets that are part of a single Excel workbook.

Excel VBA allows you to access any worksheet in three ways: by its name, by its number in the workbook, or with a loop that checks each worksheet.
1. Using the worksheet name.
Worksheets("Sales").Range("A1").Value = "Hello"2. Worksheets(1) refers to the first sheet on the left; use its index number to reference.
Worksheets(1).Range("A1").Value = "Hello"3. Using the CodeName.
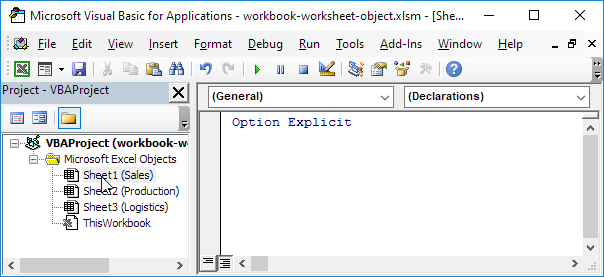
Sheet1.Range("A1").Value = "Hello"To check the CodeName of a worksheet, go to the Visual Basic Editor. In the Project Explorer, the name at the top is known as the CodeName. The second name refers to the worksheet name, and in this case, it is “Sales”.
Note: The CodeName stays the same regardless of any changes to the worksheet name or its position, ensuring it is the safest reference for a worksheet. To change a worksheet’s CodeName, go to the View tab and select the Properties Window. The CodeName refers to worksheets within the same workbook only; it cannot be used to reference sheets in another workbook.
Properties and Methods
Let us explore some of the properties and methods that belong to the Workbooks and Worksheets collections. Properties describe the features of a collection, while methods define the actions you can perform on it.
Place a command button in the worksheet and write these code lines:
1. In Microsoft Excel, the Workbooks.Add method helps you make a new workbook.
Workbooks.AddNote: The Add method in Workbooks creates a new, blank workbook within the currently open instance of the Excel application.
2. The Worksheets.Count property displays the total number of worksheets in a workbook.
MsgBox Worksheets.CountBelow shown the results when the command button is clicked on the sheet:

Note: In Excel VBA, Workbooks.Count gives the total number of workbooks that are currently open in Excel.
1/8 Completed! Explore more details about books and sheets. ➝
Next Chapter: Range Object